Bathrooms That Work For Everyone
This is an excerpt from the Book called “All New Bathroom Ideas That Work” by David Schiff . Continue reading to learn more about Bathrooms That Work For Everyone, thanks to the author.
You’ve probably heard the terms “accessibility,” “universal design,” “aging in place,” and maybe even “living in place.” But what do they mean? What’s the difference between them? And why should you care?
An accessible bathroom is one that is designed to be usable by someone with a serious mobility issue, such as a wheelchair user. The Americans with Disabilities Act requires accessible bathrooms in public places but makes no requirements for private homes.
Universal design means creating spaces that are safe, comfortable, and accessible to people of all ages, sizes, and physical conditions from a 3-year-old to a 95-year-old to a 19-year-old who broke her leg while snowboarding as well as the three-quarters of Americans who wear eyeglasses or contacts. (You know, the silent majority who don’t have a clue what is written on the back of a shampoo bottle!)
“Aging in place” expresses one of the goals of universal design-if you create a space that addresses the needs of older people, you’ll be able to stay in your home as you age. The term “living in place” was more recently coined in response to market research showing that most people don’t know what universal design is and don’t want to think in terms of aging in place. Some contractors, designers, and other pros take courses with the National Association of Homebuilders (NAHB) to become Certified Aging in Place Specialists (CAPS) or with the relatively new Living in Place TM Institute to become Certified Living in Place Professionals (CLIPPTM).

Whatever you choose to call it, it’s simply smart to think about universal design when remodeling or building a new bathroom. Most likely your project will have physical and financial constraints that will require compromises. For example, you might not have room for a wheelchair-accessible shower, but if you are building a shower that happens to be large enough, consider making it curbless. You’ll thank yourself if you ever need a wheelchair-even temporarily-and you’ll eliminate a tripping hazard for everyone. Plus, curbless showers look great.
And looking great is a hallmark of successful universal design. Nobody wants an institutional-looking bathroom in his or her home. Fortunately, manufacturers realize this, so you’ll have no problem finding gorgeous products that can be incorporated into universal design. Also, universal design isn’t just about the products themselves-it’s about smart use of products. Here are some ideas to get the conservation going when you talk to your architect or designer. Some of these ideas are simple enough to retrofit, so you might think about incorporating them in the other bathroom down the hall.
Think “Thighs to Eyes.”
That’s about 24 in. to 60 in. above the floor-the range that’s easy for most people to reach. When designing storage, try to keep the things you’ll use most often at that height range.
Add A Horizontal Line.
As mentioned, many of us wear glasses or contacts that we remove while taking a bath or shower. Add to that the fact that a shower fills with steam and we can lose a significant amount of depth perception if the wall is painted or tiled a consistent color. Creating a band of contrasting color-paint or a course or two of tiles at about 5 ft. from the floor-provides depth perception and a level orientation. It can look really sharp, too; in fact many bath designers use horizontal lines to tie elements together visually or to make a bathroom seem more spacious. If you have glass shower doors, a horizontal line etched into the glass is also helpful.
Make Shower Controls Easy To Reach.
As larger showers have become more common, bath designers have begun putting the controls near the entrance rather than directly under the showerhead so you don’t have to lean over to avoid the water while adjusting the temperature. Turns out, this is also better for your back and decreases the chance of falling as we get less nimble with age.
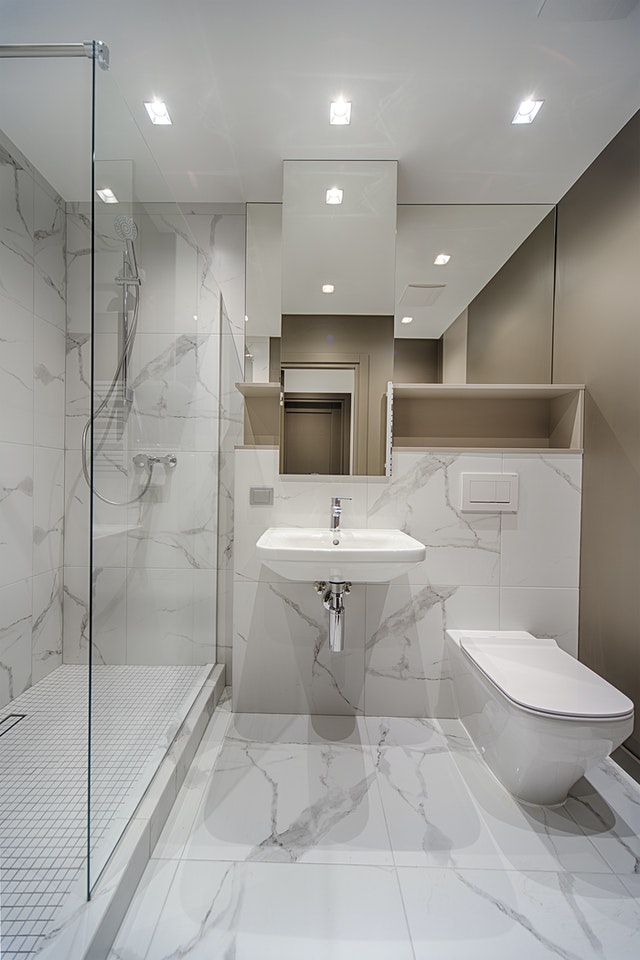
Install A Curbless Shower.
Showers that have no curb and employ a linear drain have exploded in popularity simply because they look better and more up to date than a shower with a curb and round drain in the middle. A shower without a curb is safer for everybody and can make the shower accessible to a wheelchair user. Creating a custom curbless shower with a linear drain can be expensive because the slope needs to be built into the floor. But manufacturers have responded with sloped shower pans that bring the cost down. Keep in mind that a curbless shower needs to be at least 36 in. wide to prevent water from splashing out.
Use Vertical Shower Door Handles.
A horizontal shower door handle is dangerous because people may grab for it if they slip. Shower doors are not designed to take weight and could come down if grabbed.
Make Sink Controls Easier To Reach.
This is a good example of the difference between accessibility and practical universal design: If you were designing for true accessibility for someone in a wheelchair, you would leave a clear space under the sink so the person could roll his legs undermeath. However, if you are not designing specifically for a wheelchair user and you don’t want to give up the storage a vanity supplies, you might position the vanity in a spot where someone could parallel park their wheelchair next to it and you could reach them. You can accomplish this by rotating a round sink with faucet holes or you could use a sink with no holes in conjunction with controls mounted in the counter. The sink will be easier for kids to use, too.
Install Single-Lever Sink Faucets.
These decrease the probability that a user will accidently turn on full-hot water. Levers in general are easier for children and people with arthritis to use.
Use Door Levers.
As with sinks, levers are easier to operate than knobs. Plus, you can push a lever down with your elbow when you enter the bathroom with an armload of towels. It’s also helpful for door handles to be in a color that contrasts with the door.
Carefully Consider Toilet Height.
Most experts recommend installing “comfort-height” toilets that are 18 in. high because they make it easier for older people to sit down and get up. But Richard Duncan, executive director of the Universal Design Institute, points out that comfort-height toilets can be difficult for short people, including children, to use. Noting that there are devices to raise toilet seat height, Duncan suggests that a comfort- height toilet can be good idea but only if you have a lower toilet elsewhere in the home. Wall-mounted toilets can be placed at any height you like.
Install An Outlet Behind The Toilet.
Today you can buy toilet seats that are heated, provide washing and drying functions, and incorporate a nightlight. These seats need to be plugged in. You might not opt for a multi-function seat now, but all of those functions are helpful for older people and people with mobility issues. Adding an electrical outlet is cheap and easy during construction, and it is also a great place to plug in a simple nightlight.
Provide A Strategic Nightlight.
A nightlight behind the toilet or incorporated into the toilet seat is ideal because it pinpoints the most likely middle-of-the-night destination. An LED strip installed in a vanity kick is another easy-to-install solution.


Provide Grab Supports. The word “grab bar” conjures images of institutional stainless steel that nobody wants in their bathroom. But you can find grab bars in a wide variety of colors, styles, and materials to match any décor. An attractive grab bar wrapping around the bathroom can be striking design feature. You’ll also find towel bars, toilet paper holders, and cup holders that have short, small-diameter handholds molded into the sides. It is a very good idea to provide a short handhold directly over the shower controls. People will get used to grasping the handhold with one hand and adjusting the controls with the other. And should some-one slip, they’d reach for the handhold, not the controls.
Put Witches At 44 In. In many homes, the bottom or the top of light switches are positioned 48 in. from the floor. This was done simply because drywall sheets are 48 in. wide and drywall installers found it easier to notch either the top of the bottom sheet or the bottom of the top sheet than to cut holes. However, centering the switch at 44 in. puts less strain on the shoulder. Most drywall installers now cut switch holes after putting up the sheets, so placing switches at the optimum height is no extra work.
Heat The Floors.
Many people install radiant floor heating in the bathroom simply because it is a pleasure for bare feet. It’s also safer because heated floors dry faster, and dry floors are less slippery.
Conserving Water and Energy
The bathroom is the biggest consumer of water in the house, with the toilet alone using up to 27% of the 400 gallons a typical family of four uses each day. It takes energy to heat water, and it’s easy to forget that we use electricity to move that water around. If you use municipal water you are paying indirectly; if you have your own well you are paying to run your water pump. It all adds up to a lot of water-and dollars-down the drain.
There are two overall strategies for using less water-you can use water-efficient fixtures and you can install an efficient plumbing system. The first is very easy to do, especially if you are building or remodeling. Just make sure to install showerheads, faucets, and toilets that have the WaterSense® label. WaterSense is a voluntary partnership program sponsored by the U.S. Environmental Protection Agency. Partners include manufacturers, retailers, and distributors of products that use water. To qualify for the label, a product must be at least 20% more efficient than average products in that category. Plus, qualifying products must perform as well or better than other models.
The best plumbing design is an integrated system built into the house and involving the kitchen and laundry as well as the baths. For example, you could opt for “home run” hot water supply lines in which each fixture or faucet has its own pipe directly to the water heater. This will cost more to install than a more conventional trunk-and-branch layout, but you’ll lose less heat as the water travels through the pipes, saving money in the long run. You’ll also save time and water because you won’t have to run water as long while you wait for hot water to reach faucets.
But it’s probably not practical to retrofit an entire water distribution system unless you are building a new house or gutting an old one. One good option for a bathroom remodel or addition is to install an auxiliary hot water heater in or near the new bathroom-there are small models designed to fit in a vanity. This would eliminate the wait for hot water. You can also install an on-demand water heater that doesn’t provide instant hot water but does provide limitless hot water.
One very simple energy-saving strategy is to prevent hot water from cooling by insulating water pipes. If your water heater is warm to the touch, purchase an insulated cover made to fit it. More complex strategies such as a drain-water heat recovery system cost more initially but can also reduce hot-water costs substantially.
Reusing gray water that goes down the drain after a shower or from a washing machine also holds promise for using less water. While gray water isn’t potable, it’s not especially dirty either and can be used for watering the lawn or garden. If code allows, gray water can also be used for flushing toilets.
All of these things are worth discussing with your plumber when you are building new or undertaking a major bathroom remodel. You’ll find that taking relatively simple steps while the house is under construction may pay dividends down the road.


